Showing posts with label corn free. Show all posts

Wednesday, January 9, 2013

Tomato Free Chili 2

Tomato Free Chili 

Ingredients:

1 lb ground meat
1 can Black beans, drained
1 can Kidney Beans, drained
1 medium Onions, diced
2 cloves Garlic, minced
1 large Carrot, diced
1 stalk Celery, diced
2 c Tomato Free Sauce (click here)
2 Tbsp Chili powder (leave out if nightshade free)
1 tsp Cumin (increase to 2 tsp if leaving out chili powder)
1 Tbsp Cilantro
1/2 tsp Oregano
1 tsp Salt
black pepper to taste
Olive Oil
Water

Instructions:

Heat oil.

Add meat onion, vegetables, salt, peper and garlic until browned.

Add tomato free Sauce and seasonings.

Heat until bubbling, the reduce heat and simmer.

Add water to desired thickness and simmer until veggies are tender and flavors are set.


Makes 6 servings.

Tuesday, January 8, 2013

Coconutty Cacao Yum!

Photo Credit Jupiterimages/Photos.com/Getty Images
So our life seems to always be changing.  Changing job, changing houses, changing activities, changing ages, changing stomach issues.... Lately, the honey man seems to be having more gut issues and we have been tweaking some dietary things. I've been experimenting with some raw foods and no-grain "cooking" for a while and trying all kinds of fun new things. Coconut flour, coconut sugar, almond flour, flax seed meal as flour, and cocoa nibs are some fun new things. 

So honey loves him some dark chocolate but does not need the dairy and sugar. We were eating at a fellow gluten-free-ers home one night when she whips out these scones with little flecks of chocolate in them! (You should be drooling about now.) After inquiring a little to the ingredients we all pretty much cleared off that plate of scones. Then we asked, "What did you do for the chocolate?"  And the answer was, "cacao nibs." 

A little research on these wonderful little crisps showed some pretty amazing benefits. (Click here for a link to some great info on Cacao Nibs.) 

So, for those who "NEED" a fast chocolate fix in your life without the diary and mounds of sugar...

Coconutty Cacao Yum

1     tsp Organic Cacao Nibs
1-2  tbsp Coconut Oil
Unsweetened Shredded Coconut (to taste)

Mix together in a small bowl and roll out into balls or spread on some yummy GF toast.


NOTE:  Well, of course, you can add sugar if you want. And feel free to double up the recipe and share!!!


Sunday, December 30, 2012

No Tomato BBQ Sauce #2


Since first publishing a link to a tomato free BBQ sauce [here], it continues to be one of the most visited post.

Since everyone likes a little change, thought I'd "kick it up a notch" and give you an alternate BBQ sauce recipe that still contains no tomatoes! Whoo hoo!!! Enjoy.

Ingredients:
1 cup gluten free yellow mustard
1/3 c molasses
1/2 cup balsamic vinegar
1 tablespoons butter
1 tablespoon Lea & Perin (gluten free) Worcestershire sauce *
1 tablespoon lemon or lime juice
1 teaspoon cayenne** (OK, so this make it not nightshade free.... so if that's OK for you, "kick it up a notch", if not.... leave it out)
Preparation:
Mix all ingredients together and simmer over a low heat for 30 minutes. If your making this sauce for a whole hog multiple the ingredients by about 8.

Makes about 2 cups.


* To make a homemade gluten free, soy free, corn free Worcestershire sauce, check out Gluten Free Mom's blog here. (Just make sure you leave out the red pepper to make it nightshade free!)
** A milder alternative to cayenne is paprika.

Thursday, December 27, 2012

Grain Free, dairy free, egg free Pancakes

One of my latest muses has been working towards less grain in our diets. Yes, we are already gluten-free, but my dear husband seems to be reacting to oats. A friend introduced me to coconut flour a while back and I gotta say it has been a fun addition to our diet. Not only do you increase your fiber without increasing your glycemic load, it's yummy!

Since pancakes and waffles seem to be a weekly necessity at our house, I'm experimenting with a recipe that works with no eggs.  

Ingredients:
1/2 c. coconut flour
1 tsp baking soda (gluten free)
1/4 tsp salt
8 Tbsp warm water
4 Tbsp milled flax seed
3/4 c. coconut milk/almond milk (my favorite is the mixed one)
1 tsp vanilla
1 Tbsp honey or aguave
coconut oil/olive oil

1) Place milled flax seed and warm water in mixer. Whip until frothy.
2) In separate bowl mix dry ingredients together.
3) Gently mix wet ingredients into dry mixture, then add in flax seed mixture.
4) Preheat griddle and lightly grease with oil, drop approximately 3 tablespoons of mixture onto griddle and flatten out to shape pancake. Lightly brown one side then flip and brown second side.
Try them and let me know what you think! 

Tuesday, March 15, 2011

No Tomato BBQ Sauce

I am sooo excited! Something happened today that had my #3 child jumping for joy.

We have searched and tried for quite some time to find BBQ sauce without tomatoes that is palatable for a child. (There's a reason they put sugar in the ketchup.) Since nightshades and additives are a big "no-no", store bought sauces have not worked for us. Today we had a roast in our old friend the crockpot and a some serious hankering for BBQ.

Once again I googled and searched. Then viola'!!!  There was this allergy friendly recipe made with common household items. (What a concept!) I cut, paste and printed that bad boy then handed the recipes to my hubby. "Have at it," I said. "Let us see how it turns out."

Umm.... YUM, it was!
Thank you Mr. Riches at About.com for making one night-shade free kid happy and his mama proud.


(By Derrick Riches, About.com Guide)

Sweet Mustard Barbecue Sauce

This is a mustard-based barbecue sauce, which might sound strange to a few people, but is actually a delicious Southern barbecue sauce. The combination of mustard and molasses gives barbecued meats a sweet and sour flavor.

Prep Time: 10 minutes
Cook Time: 10 minutes
Total Time: 20 minutes
Yield: Makes about 2 cups

Ingredients:
• 1 cup prepared mustard
• 1/2 cup molasses
• 1/4 cup cider vinegar
• 1/4 cup honey
• 1 tablespoon oil
• 1/4 teaspoon powdered oregano
• 1/4 teaspoon powdered thyme
• 1/4 teaspoon ground black pepper
• 1/4 teaspoon cayenne (we left out the cayenne, because we think it's a nightshade and it was totally yummy without it)

Preparation:

Combine dry ingredients in a saucepan. Add enough vinegar to make a mixable paste. Mix well. Place over high heat and add remaining ingredients. Bring to a boil, stirring constantly. Reduce heat and simmer for 10 minutes, stirring occasionally.
-------------
NOTE: throw this stuff in with your roast and let is simmer on slow.... melt in your mouth BBQ shall ensue.

Sunday, March 13, 2011

Quick Rice YUM!

This recipe was born out of a need to make something quick with what was on hand. Also, I was truly hankering for some recipes with some coconut flavor but lacked some ingredients. So I played around and it turned out great!

Quick RICE Yum

2-3 c. cooked brown rice (sweet is yum)
2 Tbsp oil
1 tsp sesame seeds
1 large carrot, shredded
1 medium onion, chopped
1 tsp garlic, powdered (or use fresh)
1/2 tsp curry
1 tsp cilantro
1 tsp salt
1/4 c. dates, chopped (or raisins)
1/4 c. chopped almonds
2-3 c. water (or you could use coconut milk and omit coconut flour)
1 c. green beans (already cooked)
1 c. kidney beans (already cooked)
¼ c. coconut flour

In a skillet, heat oil and add sesame seeds. When they begin to pop, stir in onion and carrot shavings. Cook for a few minutes until the onions begin to get soft, then stir in curry, garlic, cilantro and salt. Combine well, then add rice, beans, nuts and dates. Add the water and stir well. Cover, bring to a boil, then simmer on low until flavor is cooked through.

Serves 4-6

The fun part of this recipe if that you can vary the beans/vegetables. You can omit the coconut if it’s not your thing. You can cook the rice/fresh green beans with all the seasonings on low (or use your handy, dandy crockpot). Have fun!

Friday, October 15, 2010

Rice Yogurt! Coconut Yogurt!

I just love discovering new things.  I've always been a yogurt fan... long before it was cool and people even knew what "probiotics" were.  After we found out about the diary allergies we switched to soy yogurt for the kids.  However, my hubby and now forth child just can't do soy.  (Little man breaks out in hives!)  So yogurt has only been snuck into the house when no one was looking and eaten behind closed doors.(Seriously.... it's sad... I know...)

Until now....
Viola'!  Rice Yogurt!  Coconut Yogurt!!!! 
I soooo am digging out some cake recipes that use yogurt in them!  Just wait.... they are coming soon! However, smoothies will take on a new meaning.... fruit and yogurt swirled together, maybe even some agave nectar.... ummmm......

Sorry, I must go pull out the blender!

Have fun...
http://www.ricerafoods.com/
http://www.turtlemountain.com/products/coconut_yogurt.html

Wednesday, September 22, 2010

Easy Watermelon Sorbet

Sometimes, I just want to go to the store and buy some ice cream! Or sorbet! Or some frozen dessert that is allergy friendly and not loaded with lots of chemicals!  Sure, I can head off to the health food store and find something... but when you have to pay a ginormous price for an eensy-weensy cup of dessert... well, with four kids... that just doesn't go very far. 

So I had a watermelons and some hungry chitlins wanting some "zert" [i.e. what my four year old calls dessert].  Sorbet sounded wonderful to me... but I had to look around and experiment a bit to find something that worked without alcohol or corn syrup.  There are tons of marvelous recipes out there if corn or alcohol or dairy isn't an issue for you.


Easy Watermelon Sorbet
Watermelon
1 c. Water
1 c. Sugar
1 tsp. Vanilla
1 tbsp. Lime Juice


1. Take the equal amounts of sugar and water and stir them together.  Heat them in a microwave to bring them to a boil (stir every minute or so to keep the sugar dissolving).  You are basically making a sugar syrup out of this.  Once you have this nice sticky syrup... let it cool down.
2. seed and chop up some watermelon (or buy seedless)
3. puree the watermelon (you need 4-6 cups of puree)
4. add the syrup, vanilla and lime juice to the blender/food processor and make it nice and slushy. 
5. Immediately put in a covered freezer container to freeze. 

Takes 4+ hours to freeze, then you scoop and serve!!!

Tip:  I didn't let my "syrup" cool down enough and my sorbet didn't want to freeze.  My kids were dying to have some, so I took out have of the slush mixture, put it in the blender with some ice and made one awesome slushy/sorbet mixture.  It really froze up nicely with the ice added.... yum!!!  But very sweet!

Thursday, September 16, 2010

Chocolate Belgian Waffle Recipe

I was in a funky mood.

My sweet daughter (my morning child... which she does NOT get from her mother) comes to my bedroom the other morning.  She sweetly asks me if I would like for her to make waffles.  I smile.  (I mean really! Who would not want someone else to make them homemade waffles from scratch..... seriously!)  She asks me, "Blueberries or no blueberries???" 

I look at her and think of the little containers of fresh strawberries I had bought the day before..... "Hey, sweetie.... Do you think you could make mine with some strawberries on top?"

She looks at me and says, "Sure, Mom."

Then I thought about the other things I had bought at the store, the days gone by when we could actually visit a restaurant that serves breakfast and had this incredibly wild hair.... "Hey, sweeeeetieeeee."  [with all the sweetness I could muster that early in the morning] 

She says, "Yeeesssss???"

I say, "What do you think about adding some cocoa powder in there and making them chocolate.  Then I could cut up the strawberries for a sauce on the top and then sprinkle it with powered sugar!"

She looks at me as if I had lost my mind.... [we do not typically serve sugar as a breakfast item around our house].... "What???" 

I crawl out of bed, tell her to get the ingredients out while I run a toothbrush over my morning breath, drag myself to kitchen,  and sweetie pie and I began our concoction.......

Chocolate Belgian Waffles
1 c. white rice flour
1 c. brown rice flour
1 c. corn starch (or potato or tapioca starch)
4 tsp. baking powder
3 Tbsp. cocoa (more or less to taste)
2 Tbsp. sugar
2 tsp. xanthan gum
1/2 c. oil
1 Tbsp. vinegar
2 tsp. vanilla
3 c. water
3 Tbsp. flax meal + 1 tsp. gelatin (heat this in a microwave and stir for about a minute)

Topping:
Strawberries (washed and chopped or make into a gel with some tapioca & water and puree)
Powdered sugar

Heat the waffle iron and coat with a cooking spray.  In a small bowl, sift together flours, baking powder, salt and sugar. 

Beat flax mixture (like an egg replacer) in large bowl.  Add in oil, buttermilk, vanilla extract, and the sifted dry ingredients.  Beat just until blended.

Pour 1/4 of the batter onto the heated waffle iron.  Close and bake until steaming stops.  Repeat with remaining batter.  Makes about 6 waffles (depending on the size of your waffle iron)

Note: you can also drizzle chocolate syrup across the tops instead of syrup.

Warning: Pretty much be prepared to have hyper children after this breakfast!

Monday, September 13, 2010

Crock Pot Roast & Cobbler

There's a nippy feeling in the air. I even saw a small flock of geese in their V formation flying over just the other day! Fall is coming. It makes me think of the fair, hay rides, wearing jackets in the morning waiting on the bus and running barefoot in the afternoons when the day warmed. Also, the last of the garden was usually coming in and grandma would make lots of soup. Mom would have that crock pot a bubbling.... the smells getting off the bus would make you run to the house to just get a taste!


I got so excited last week I ran out and change my lawn decorations then came in and threw a roast in the crockpot! 

Then I tried something I had wanted to for a long time.... Crockpot Cobbler!  It worked wonderfully. 

I threw it all in and we came home Sunday to a dinner my sweet grandmother would have been proud of!


My crockpot seems to be my best friend on busy days. One of the few things you can just leave running and come back in a few hours to enjoy! With not eating out very often I have come to appreciate this little device in so many ways in the last several years. So dearies.... pull that thing out of the back of your closet, remove the dust and crank it up! It's time for some yum!
Cobbler in a crock pot!
Easy Roast!
Roast
Salt
Garlic (opt.)
Onion
Carrots, celery, potatoes (or sweet potatoes!), green beans or other fresh veggie.
Water (apprx. 2 cups)

Brown the roast in a pan first with the salt, onion and garlic then place in the bottom of the crockpot.  Chop veggies and mound on top of the meat.  Pour water over the top.  Place on lid and turn it on.

3-8 hours depending on your crockpot settings!

Tip:  You can make cobbler in your crock pot too!  Just place the fruit and liquid in the bottom, pour on the topping, place the lid on and keep the setting low.  Fresh fruit or frozen fruit works best for this.

Friday, September 3, 2010

Addictive Gluten Free No Bake Cookies!!!

These lasted, oh... 5 minutes!
Warning: this post my be addictive to your taste buds, proceed with caution and lots of calorie reducing jogging.

So a few weeks ago I was having a conversation with some friends about "no bake cookies".  They were talking [and salivating] about how much they "loved" no bake cookies.  I heard them describe their late night kitchen excursions to make the craved for cookies.  I felt left out.  I don't recall ever having eaten "no-bake" cookies that tasted soooo good that I craved making them 20 years later after having been lovingly served them by my mother as a child. [What was I missing in life?  I've got to talk with my mom!]

I inquired about ingredients and cooking methods [confirming my suspicions that we would definitely have to make some substitutions].  Plus, those "no bake" cookies actually had to be heated up in a pot on the stove.  [So technically they were not baked... but did require some form of heating.  Hmmm...]  So, I did what I always do when my taste buds are piqued.... I went home and researched. 

Could there be a TRUE no-bake cookie that didn't require eggs or anything to make it rise while baking?  Was there a cookie that could be held together by something other than peanut butter?  Could it be made gluten-free?  Would it taste like something other than unbaked cardboard?  What about the usual cost factor?  Hmmmm.....

I have to tell you.... [jumping up and down at the computer right now]... what I came up with was phenomenal.... easy.... made with common ingredients... and totally addictive!!!!  They are light, yummy with a hint of chocolate and practically melt in your mouth!  Does telling you that we made them three times in the past week and a half help you understand?  [Mom... how could you have not ever made something like this for your precious darling daughter so many years ago??? It's o.k.... really.... it probably saved me many pounds on my torso... so I forgive you mom.]

Without further adieu....


"Gluten-free No Bake Cookies"
before being "rolled & powdered"

2/3 c. sugar
1/2 c. butter (or g-f margarine) softened
1 1/2 tbsp. unsweetened cocoa
1/2 tsp. g-f vanilla
2 c. g-f oatmeal  (I used the old fashioned kind)

"The Powdered Icing"
1/4 c. confectioners sugar
1/4 c. coconut flour (optional... you can just use the powdered sugar)

1) In a large bowl, cream the butter with the sugar, cocoa and vanilla.
2) Add oats and mix well
3) Squish together about a tablespoon size into a ball, then roll the ball around in the "powdered icing" and place on wax paper.  [Makes about 40 balls]

*** I'm just warning you... go ahead and make a double batch... those little things pop into your mouth and disappear before you know it! 
Options:  You can add things to this recipe like coconut or peanut butter or some flavoring.  You can even roll them in nuts also if you like.

Wednesday, September 1, 2010

New Computer... new recipes... new fun!

Yes!  The move and house remodeling are complete.  The old computer has been replaced with one that allows me to blog again.  Life is good!  I'm back..... [miss me?]

I've been learning where all the health food stores are here and what they carry.  I've been finding fun new blogs and companies that carry gluten-free foods/recipes.  I think mainstream corporate industry is finally catching on to the g-f market.  Hooray!  [Even Bisquick is on board!]

My dilemma still remains that families [like mine] with multiple food allergies still struggle to find allergy-safe foods in this modern convenience mentality world we live in.  Sigh.... Our favorite g-f cookies and 0pancake mixes have potato starch/flour in them.  Most of the really yummy bread recipes still use eggs and many use dairy.  What's a cornbread lovin' gal to do???

In the words of Dory from "Finding Nemo", "Just keep swimming... just keep swimming... ah, ha, ha. haaa...." [well maybe I should say, "Just keep baking..."]

So, my dear patient readers.... until Betty Crocker and other famous brands can make our meals more convenient, here is my offering of love to you.  A quick dessert I throw together when we need a sugar rush or unexpected company comes or just when I need to use up some ripening fruit!

Quick Fruit Cobbler
2 cups fresh fruit you have on hand (peaches, strawberries, blueberries, apples, or pears work great)
     or  2 cups of frozen fruit (obviously defrosted)
1 cup sugar [agave if you like less sweet]
1 tbsp. tapioca [optional]
1 cup g-f flour (sorghum with a little buckwheat is yummy)
2 cups g-f oatmeal
1 stick butter (or dairy free margarine)

Preheat over to 350 degrees.

Filling:
I have a favorite stoneware pan I love to make this in, but you can just use a pie or casserole dish. 
Prepare the fruit (peel, chop, core or whatever is appropriate for the particular fruit you use).  Spread fruit evenly in the bottom of pie pan.  Sprinkle 1/2 cup sugar and tapioca over fruit and let stand while preparing "crust".  If you are using a "dry", fresh fruit (like a green apple) you may need to add a bit of water to the filling. 

Clyde the Camel likes cobbler!
Crust:
In a medium bowl, combine flour, oatmeal, remaining sugar.   "Shake" the crust evenly over the top of the filling, using a spoon to spread if necessary.  Some people like to "cut in" their butter/margarine in the flour mixture before spreading it, I prefer to melt mine and drizzle it over the top of the crust. 

Bake for approximately 30 minutes until filling is bubbling through the crust.  Serve with your favorite non-dairy "ice cream" or whipped topping.

Note:  If you like more cake-like topping, switch the amounts of flour/oatmeal ratios.  You may need to add a bit of water/liquid to the filling to keep it from being quite to dry.

Wednesday, January 27, 2010

Gluten Free Birthday (Part 1)


It is that time again.  "What time??" you ask.  PARTY TIME!

Oh, yes... I probably don't have to explain to all your "allergy moms" out there how much of an issue it can be to deal with parties when your child has multiple food allergies.  We tend to take our own cupcakes and snacks whenever we go to someone else's party.  It is just easier and I assure the mom we are totaly used to doing this.  For our own parties... I have tended to have them at home where we could control all the food issues and still have fun. 

This year, however, we recently moved [read: there are still boxes in my house] and decided on a pool party at a local indoor pool.  The problem was that pizza came included in the package.  So I had to decide... Do I just nix the whole pizza idea?  Or do I serve the pizza to the other kids and bring allergy free pizza for my family??  We decided to go with the second idea.  [Something to do with one less thing for me to prepare.]

I'm going to share some of our favorite party food recipes over the next several posts.  Maybe it will help you not have to go through as much trail and error as we did on our journey.

Let's just start with the best stuff.....
The ICING (Oh yea!)
4 c. powdered sugar
1/2 c. real butter/ or spectrum butter
1/2 c. coconut "oil" [the consistency of shortening]
dash of salt (optional)
2 tbsp. rice milk/water
1 tsp. vanilla

This is a basic buttercream icing, but without the regular shortening (which is soy based).  Store bought icings always seem o have either soy or wheat starch in them.

Cream the coconut shortening and butter together.  Add in the vanilla.  then add in powdered sugar one cup at a time.  Add in milk as you go to keep the consistency right.  Add food coloring if needed and you can tollerate them.

You can make this ahead and store in an air tight container in the fridge. 

Monday, January 25, 2010

Raw Foods??

I've been reading a lot about this lately.  We probably eat more veggies than your average family... but we still have lots of room for improvement in that area. During the past year I have discussed the whole "raw foods" craze with a couple of friends who actually eat this way.  They like it and are so much healthier because of it.  My big worry over this form of eating for us was that we simply cannot eat some of the foods because of allergies/sensitivities.  Even so, I have kept my eyes and ears open to learning more about this new eating lifestyle and how it might help us. [It's really hard for a "cornbread" girl like me to give up her hot, slow cooked veggie way of life.]

Then, it happend.  A box arrived on my porch last month.  My mother calls and says... "I want you to be healthy!"  She had sent us one of those super-sonic-juice-anything-you-put-in-it juicers!  Well... I can't have a new fun toy and not use it. I started immeadiately learning how to operate the big black machine that now occupied a large portion of my counterspace. 

Viola'!  Juicing.  I love it!  I love dumping 3 or 4 kinds of fruit in the thing with some distilled water and a few veggies and watching it swirl!  [It's kinda loud... but you adjust.]  I even made hot soup in the "health machine".  It's better than a V8.  It's fresh and RAW!  I have arrived into the raw foods world through the back door of juicing. And I'm o.k. with it!

"The Kids Favorite Juice"
1 c. frozen sliced strawberries (you could use fresh)
2 large oranges (peeled, we like seedless)
2-3 carrots (we like to peel ours... less gritty)
2 stalks of celery
2 c. distilled water

Dump it in, turn it on... dance around the kitchen... then serve it to your babies with a smile! 
Note: It isn't necessary to tell them it actually has veggies in there.

Gluten Free on a Diet??

It January.  I think every ad I see right now has to do with taxes or diets.  Sigh....

I read an article quite a while back that stated an interesting fact.  It said that family memebers who were not gluten intollerant, but ate the gluten free diet tended to gain weight. So that explains it!  (And I thought it was all the GF cookies I made. Ha!)  The gluten free diet can tend to have more calories that a standard diet because of the extra protein and good fats (nuts, oils, seeds).  I have to say that I am much healthier having gone through this whole process with my family (and a bit heavier also). 

So these past couple of weeks I have been working on menus that included recipes that I could pull out my portion and then let the family have at the rest.  I picked up a "Weight Watchers" 5 ingredient/15 minute recipe book (sounds about my speed most days) actually had a slew of recipes that I could prepare for my family!  Recipes like "Lemony Broccoli", "Pears and Greens Salad", "Orange Chicken" and even a quinoa recipe!  I did have to leave off some cheese here or there.  It was so nice not to have to fix me a seperate "diet" meal.

It inspired me!  I have an old Weight Watchers Points counter.  So I'm attempting to become more aware of the portions I eat with my family.

Here's a little something for you...

"Baked Salmon"

1.5 pounds salmon (usually sectioned into fillets)
1/3 c. lemon juice
salt & pepper (to taste)

Preheat your lovely oven to 400.  Arrange fish, skin side down, on pan (I like my stoneware pan).  Salt and pepper fish.   Drizzle the juice on top. Lay a piece of foil over the top of the dish.  Bake approximately 20 minutes.

Servings: 4
Points: 7 per serving

Serve with a big salad and some rice prepared the way you like... Better than a resturant!

Thursday, December 24, 2009

Merry Christmas Cookies!!!

Alas... computer issues have kept me from posting far too long!  So I've confiscated hubby's laptop and uploaded some pics to the photobucket so I can at least give you a Christmas Cookie recipe. I plan on getting that man to help me figure this thing out this weekend so I can get back to sharing with you guys all the fun baking we've been doing for the holidays! 

I hope your time this season is peaceful and a little merry too. 

I tell you.  Cookies have been a delima for us.  When you can't use an egg in the mixture cookies just kinda fizzle (to say the least).  Well this holiday season I have discovered a new thing!!!!  COCONUT! (O.K. it's sort of an old thing..... but new to me!)  Coconut milk does a marvelous job in pudding mixes (rice milk just never cut and things were always a bit runny).  Coconut "oil" (which looks a whole lot like shortening) works just marvelous as... well... shortening! 

So for all you dearies out there who just can't tolerate the soy and dairy.... this ones for you!

[I adapted this one from a recipe for Pumpkin Cookies over at Karina's Kitchen....]

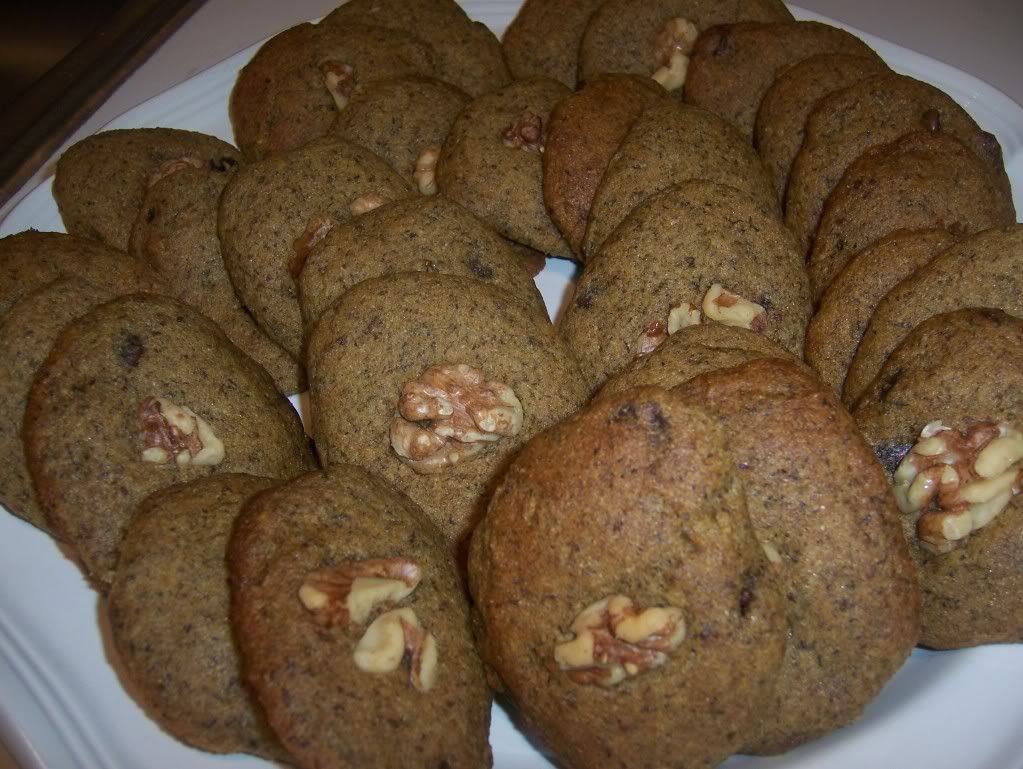
Chocolate Chip Cookies
(that actually have the texture of a cookie... yahoo!!!)

Wisk the dry ingredients together:
2/3 c. buckwheat flour
1/3 c. millet flour
1/2 c. sorghum flour
1/2 c. corn starch (or tapioca or potato)
1 tsp. baking soda
1 1/2 tsp. baking powder
1/2 tsp. sea salt
1 tsp. xanthan gum
1 tsp. cinnamon

Beat the wet ingredients with the sugar:
1 c. canned pumpkin
3/4 c. coconut oil/shortening (or Spectrum Shortening)
flax meal egg replacer for 2 eggs (or eggs if you can) ***
2 tsp. vanilla
1 c. brown sugar (or 1/2 c. agave)

Add in the dry ingredients and beat until combined:

Add in:
1 c. chocolate chips (sun chips if you can't do the regulars)
1/2 c. pecans/walnuts/or your favorite (or none if you have an allergy)

Mix in the addins.  Your cookie dough wil be soft and sticky.

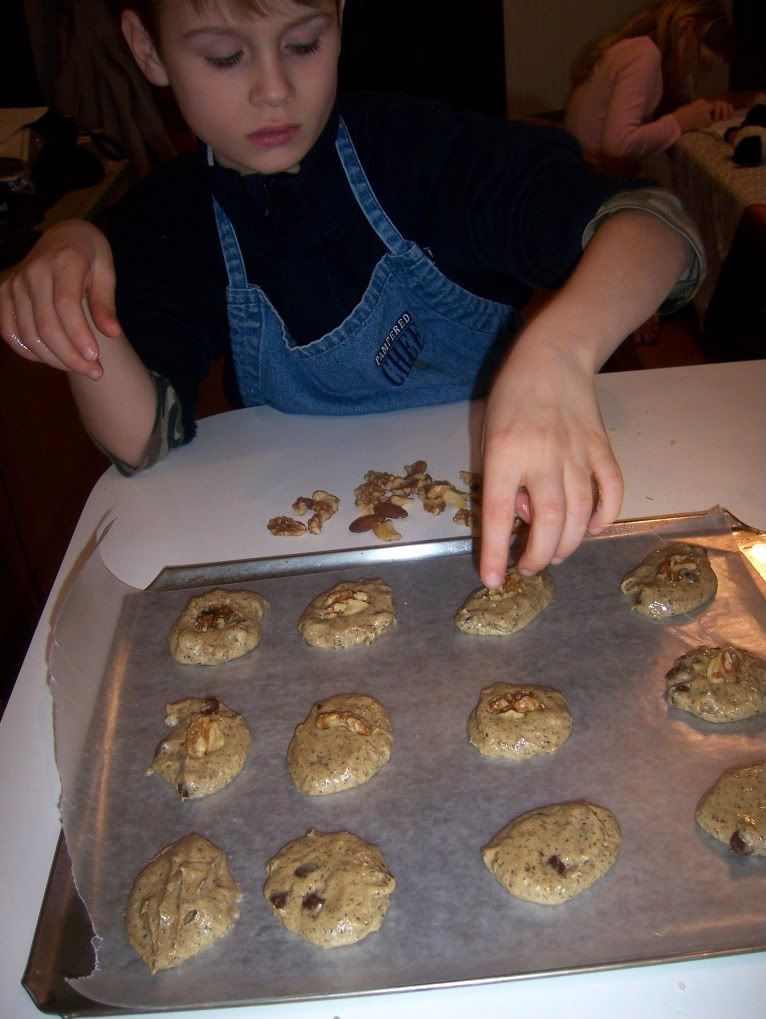
Preheat the oven toe 350 degrees F. Line the baking sheet with parchment paper/ or wax paper.  Oil your hands.  Drop golf ball size clumps of cookie dough on the prepared baking sheets.  Round and flatten with your hand (not too flat).  Press a nut on top of each cookie.  Bake 15-18 minutes until firm.  Cool on wire rack.

I don't know what the pumpkin does to make that dough smooth, but YUM!  We like more chocolate chips.
These actually taste and "feel" like a cookie!!!!  Woohoo!!! 


Tips: If you are not a buckwheat fan.... go with more millet and sorghum instead!

*** Egg Replacer (this amount for each egg)
1/3 cup of very hot water
1-2 tblsp. flax meal
Stir the flax meal into the hot water and let sit while you are preparing the other parts of the recipe.  Stir every little bit until you get ready to add it to the recipe.  It's best if it has time to become more like gelatin.  Oh!  And it's got lots of healthy stuff in there for you too!

Monday, November 9, 2009

Hamentaschen (Feasts of Purim Cookies)


We are studying ancient history right now with the kids.  We've reached the Persian Empire days and it's been quite enlightening!  Floating bridges, conquering armies, the orginal postal system and.. ah, yes!.... the story of Esther (Hadas'sah).  The Feasts of Purim actually don't occur until February/March-ish... but we decided that since this is the season of Thanksgiving... why not!  We're a having our feast tomorrow along with making the Hamentaschen Cookies for the neighbors and finishing our "shoeboxes" for the poor (actually Operation Christmas Child... but it works).

I was totally excited to find a gluten free version of the triangle cookie (said to be shaped like the hat of Haman... "boo...hiss!"). 

Check out this website for more info on the Feasts and other interesting info.
http://www.jewfaq.org/holiday9.htm

Hamentaschen

2/3 cup butter or Spectrum margarine
1/2 cup sugar
1 egg  (we will use the flax-egg replacer)
1/4 cup orange juice (the smooth kind, not the pulpy)
2 cups GF buckwheat
1/2 milled flaxseed
1 tsp. baking powder
1 tsp. cinnamon
Various preserves, fruit butters and/or pie fillings.

Blend butter and sugar thoroughly. Add the egg (or replacer ) and blend thoroughly. Add OJ and blend thoroughly. Add flour, 1/2 cup at a time, alternating buckwheat and flax seed, blending thoroughly between each. Add the baking powder and cinnamon with the last half cup of flour. Refrigerate batter overnight or at least a few hours. Roll as thin as you can without getting holes in the batter (roll it between two sheets of wax paper lightly dusted with flour for best results). Cut out 3 or 4 inch circles.


Put a dollop of filling in the middle of each circle. Fold up the sides to make a triangle, folding the last corner under the starting point, so that each side has corner that folds over and a corner that folds under (see picture at right). Folding in this "pinwheel" style will reduce the likelihood that the last side will fall open while cooking, spilling out the filling. It also tends to make a better triangle shape.

Bake at 350 degrees for about 15-20 minutes, until golden brown but before the filling boils over!

Traditional fillings are poppy seed and prune, but apricot is yum. Apple butter, pineapple preserves, and cherry pie filling all work quite well.

The number of cookies this recipe makes depends on the size of your cutting tool and the thickness you roll. I use a 4-1/4 inch cutting tool and roll to a medium thickness, and I get 20-24 cookies out of this recipe.

The resulting hamentaschen will have an unusual pumpernickel color, but they taste great!

Make sure the buckwheat flour you use is wheat-free/gluten-free! Sometimes buckwheat flour is mixed with white or wheat flour. The Hodgson Mill buckwheat and flax linked above are gluten-free and have reliable kosher certification.


List of Dates

Purim will occur on the following days of the Gregorian calendar:
Jewish Year 5769: sunset March 9, 2009 - nightfall March 10, 2009
Jewish Year 5770: sunset February 27, 2010 - nightfall February 28, 2010
Jewish Year 5771: sunset March 19, 2011 - nightfall March 20, 2011
Jewish Year 5772: sunset March 7, 2012 - nightfall March 8, 2012
Jewish Year 5773: sunset February 23, 2013 - nightfall February 24, 2013

Friday, November 6, 2009

Meat Loaf with a Twist!

One night I was in the kitchen and running behind.  (Imagine that... seems more the norm.)  I had planned on hamburgers for dinner, but just did not want to roll out the patties.  Didn't want to stand there and flip... I was just in a non-conformist mood.  So I had this idea!  Meatloaf! 

Meatloaf is a word that has not been spoken in our household since tomatoes became a "no-no" in our main dishes.  I honestly had never known that meatloaf could be made without ketchup.  What to do?? I improvised and dug through my cabinets and concocted the following recipe.  It was truly not a beautiful main dish... being rather colorless.  (You can read here about my thing on colorful foods.)  I served it up to my family with some steamed broccoli on the side and held my breath!

My kids never cease to amaze me (on so many levels).  They scarffed that loaf down and asked for more.  I actually ended up making another for a Sunday meal at a friends house a few days later.  You just never know....

(This recipe could easily be adapted for your crockpot.)

I've posted my recipe and a copy of a completely different meatloaf recipe from the LivingWithout Magazine.  Both are sooooo yummy!

You Just Never Know Meatloaf

1 lb. ground meat (beef or turkey)
2 tbsp. dried onion flaked (or fresh)
1 tsp. garlic powder (or fresh)
1 tbsp. salt
1/2 c. gluten free oatmeal

Mush all this together in a bowl.  Knead until seasonings are completely mixed in.  Shape into a round "loaf" and place in large frying pan.  (I have surgical stainless steel pans that have "weighted" lids that help keep the moisture in and cook more evenly.  If your pans are not like this... just watch it a bit more carefully.)  Heat the frying pan on medium heat. You can brown one side of the meatloaf then flip it over or just leave it be.  It's up to your tastes.  I just put the lid on that baby and turned the heat down on low until it was done in the middle.  The oatmeal helped keep the moist loaf together.

Next time, I think I will shred some veggies and mix them in the loaf.  Anyway to get a veggie in a kid.

OK... if you WANT to... you CAN put ketchup on top!

==========================

This recipe comes from the http://www.livingwithout.com/ website.  (One of my fav magazines.)

Gluten-Free Meat Loaf
Serves 4

This unusual take on the classic American favorite contains no garlic, onion or peppers. You can substitute your favorite shredded vegetables in place of the broccoli and carrots. For a hint of sweetness, replace 4 tablespoons lime juice with an equal amount of orange juice.

2 pounds ground beef
2 cups mixed shredded broccoli stems and carrots
2 teaspoons lemon juice
½ cup + 2 tablespoons lime juice
2 tablespoons apricot jam

1.Preheat oven to 375 degrees.
2.Put all ingredients into a medium mixing bowl. Knead with your hands or mix with a wooden spoon until all ingredients are well blended.
3.Form meat mixture into a loaf and place in a shallow baking pan. Bake in preheated over for 35 minutes or until cooked through. Serve hot.

Each serving contains 622 calories, 45g total fat, 17g saturated fat, 3g trans fat, 159mg cholesterol, 14g carbohydrate, 182mg sodium, 1g fiber, 40g protein.

Recipe by Liz Scott.

Thursday, November 5, 2009

Guten Free Granola

Gluten Free Granola


1 c butter or spectrum “butter”
1 c brown sugar (organic is fun)
½ tsp salt
1 tsp cinnamon
8 cups gluten free oatmeal

Melt the butter and the brown sugar together in a large saucepan. Stir and let it simmer for a few minutes (2-3 minutes). Add the salt and cinnamon, then the oatmeal. Remove pot from heat and stir until all the oatmeal is coated. Use a couple of cookie sheets with sides and spread the granola mixture out and bake at 375° for 10-15 minutes, or until golden brown. Cool granola completely on pan, then break up into pieces and transfer to a container with a lid that seals. You can add raisins, coconut or nuts too if you are not allergic to them.

So much better for you than boxed cereals and does not leave you feeling empty halfway through the morning!

Wednesday, November 4, 2009

What a guy...


.... my Honey that is.  He is a warm breakfast kind of guy.  I, however, am not a morning kind of gal.  I cook things the night before or on the weekend and freeze back.  He likes the challenge of getting up and cooking something from scratch even though he knows he's still gotta leave for work that morning.  My only contention is the dishes he leaves... but it's hard to complain when you're biting into a hot, fresh-out-of-the-oven muffin.  (Hot muffins.... hey!  I'll even do the laundry!!)

So today's offering is from my Honey. 


Honey's Multi-purpose Muffins

4 tbsp. milled flaxseed
1 tsp. xanthan gum
enough hot water to dissolve

Mix the above together in a small bowl or measuring cup.  Whip it together pretty well and set aside.  This is your "egg replacer".  (Or just happily use 2 eggs if you can handle them. )

1 1/4 c. sorghum flour (can use millet)
3/4 c. millet or buckwheat (or even half and half)
1 1/2  c. rice flour
1/2 c. corn starch (or potato starch or tapioca starch)
1 tsp. baking soda
1 1/3 tbsp. baking powder
1/2 tsp. salt
1 c. oil (safflower, sunflower or your fav)
1 1/3 c. water
1 1/2 c. sugar
2 tsp. vanilla

Optional: 1 c. chopped fruit (cranberries, blueberries) or chopped nuts or coconut

Mix all the dry ingredients in a bowl and sift together.  Then add in the remaining ingredients (including your flax mush mix) and mix well with electric mixer.  Oil those muffin tins really well and spoon batter into muffin tins.  Bake in a preheated oven (375 degrees) for 25-30 minutes or until browned and knife comes out clean.

Drizzle with honey or serve with jelly/jam.  Yum!!!!

This recipe is very versatile.  You can interchange flours according to your needs.  You can use rice milk or water for the moisture.  You can also add more sugar (for more of a dessert roll) or leave out some sugar and replace with some honey (just decrease the liquid a bit). 


My suggestion for those with "non-cooking honeys":  The night before put all the dry stuff in one bowl, the wet stuff in another bowl (except your flax mixture - you'll have to do that one as you need it).... dump and mix in the morning!